

Email is based on SMTP which stands for Simple Mail Transfer Protocol. This protocol offers no protection on the From field in an email. It only states that it has to be a valid email address. This can lead to someone spoofing the From field and sending an email on your behalf. This is where SPF and DKIM come into play.
A Sender Policy Framework (SPF) Record is a DNS TXT record, that specifies which mail servers are allowed to send emails on behalf of your domain. This allows Spam Filters to easily check if the origin of an email is from an authorized domain.
The sequence of events of how a mail server checks SPF records are as follows:
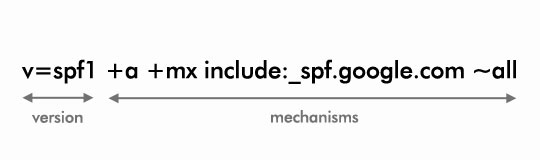
The above image is what a SPF record looks like. It is made up of the version, mechanisms and their corresponding qualifiers.
The version is pretty straightforward, it indicates the SPF version that is used and it is currently always set to spf1.
The mechanisms are checked left to right and specify the different rules for the domain.
The a mechanism specifies that if the message is sent from an IP address that matches the A Record of the domain, then the mechanism will pass.
The mx mechanism species that if the message is sent from an IP address that matches the MX Record, which is the Mail Exchange record, then the mechanism will pass.
The include mechanism points to a domain to be queried, when checking if the sending IP address is allowed or not. If the sending IP address is part of the include mechanism then it results in a match and the mechanism will pass. include:_spf.google.com is a common include when setting up G Suite on your domain. Once G Suite is setup and an email is sent, the sending IP address will be a Google IP address and the mechanism will pass as you have authorized Google to send on your behalf and the sending IP address is found inside of the include mechanism.
The all mechanism will match against everything and in this case the result will be a Soft Fail because of the qualifier, which is explained in the qualifier section below.
Qualifiers are prefixes to mechanisms which describe the action to be taken when an IP address is matched. The default qualifier is +. The different types of qualifiers are listed below:
Lastly, you do not need an SPF record on your server to check incoming emails against SPF policies published on other servers. But it is considered a good practice to setup an SPF record, to let other mail servers which use SPF filtering, check emails that maybe associated with your domain.
Now let's look at how Domain Keys Identified Mail (DKIM) works. DKIM allows the mail server to sign the emails that are sent out, which helps the recipient's mail server know it really is you who has sent the email.
Signing emails is based on standard encryption practices. The sending mail server uses the private key to encrypt the email. The recipient's email server uses the public key, which is made available in a DNS record on your server, to decrypt the received email and verify the owner.
If you are using G Suite, to setup DKIM, you need to go to your Google Admin Console at admin.google.com. Then click on Apps > G Suite > GMail and then scroll down and click on the Authenticate Email section.
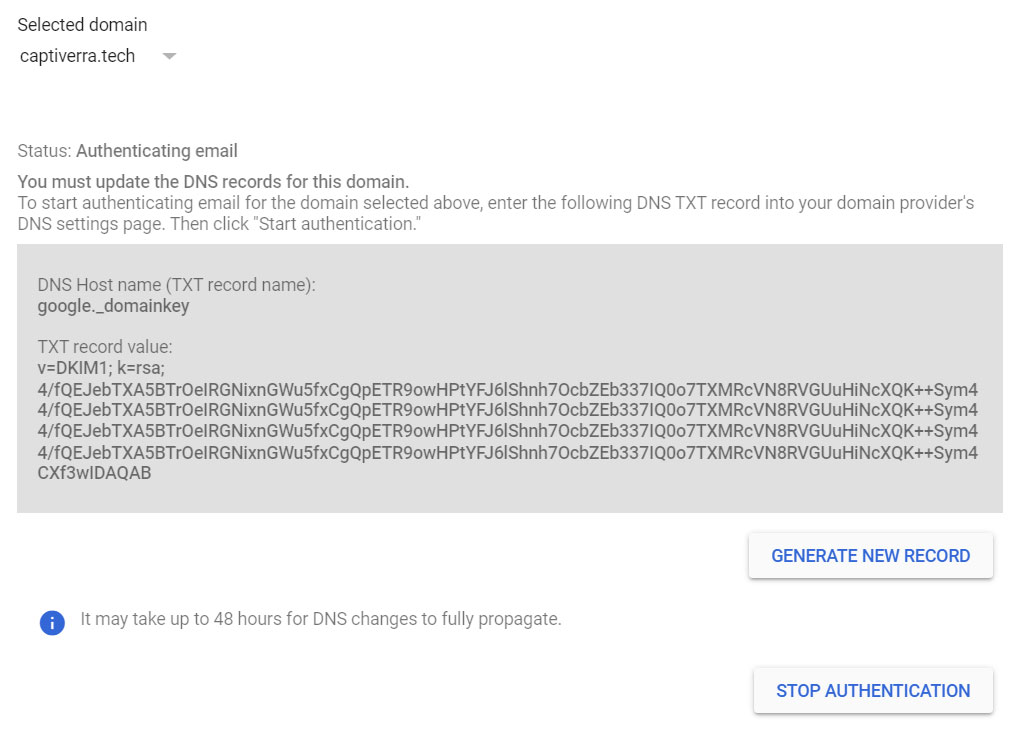
If you have multiple domains linked to your G Suite account, first select the relevant domain and then click on Generate New Record. Once the DKIM record is generated you will need to add a new DNS entry for this record. We need to wait 24 - 48 hours for this new DNS record to propagate. DNS Checker is a website you can use to check record propagation.
After the new DKIM record has propagated, you can go to the Google Admin Console and click on Start Authentication. Once DKIM Authentication is up and running all the emails will be signed and this can be verified by inspecting the email headers.
